Showing posts with label HACK ZONE. Show all posts

Best Search Engine Google Blogger


1) Say for example I was interested in 'dog training'. I could input this under interests on my profile page so that people can relate to me better - especially if they are interested in 'dog training' also - and know what I do in my spare time. Chances are, if one of my interests is 'dog training', I would have a blog dedicated to just that.

2) When I now view my Blogspot profile, I can see that 'dog training' is there hyper-linked. By clicking the hyper-link, Blogspot takes me to a page that shows me all other Blogspot profiles that are interested in 'dog training'. 

3) By clicking on each individual profile, I am able to see the blogs they have made, but also the blogs they are following. Like I said, many of the blogs the  person has made or is following will be based on his/her interests. This gives me a massive opportunity to not only gain easy backlinks to a blog (which in turn might increase my blogs search engine ranking and traffic), but gain a friendly relationship with like-minded people that might be the bulk and basis of my most regular readers.

New Gadget/Widget Blogger/Blogspot Sudoku


SIMPLY COPY THE BELOW CODE


<iframe scrolling="no" frameborder="0" width="200" src="http://free-sudokus.blogspot.com" height="230"></iframe><div style="margin:-8px 0;background:none;text-align:center;width:234px"><a style="font-size:75%;text-decoration:none;" href="http://widgetsforfree.blogspot.com/2008/01/sudoku-widget_500.html">Sudoku Widget</a></div>

Top Widget/Gadget Blogger/Blogspot Dog


SIMPLY ADD BELOW HTML/JAVASCRIPT

<object type="application/x-shockwave-flash" style="outline:none;" data="http://hosting.gmodules.com/ig/gadgets/file/102399522366632716596/dog.swf?" width="300" height="225"><param name="movie" value="http://hosting.gmodules.com/ig/gadgets/file/102399522366632716596/dog.swf?" /><param name="AllowScriptAccess" value="always" /><param name="wmode" value="opaque" /><param name="bgcolor" value="FFFFFF"/></object>

Latest Label/Tagcloud Widget


Step 1: Back it Up
Always make sure to back up your Blogger Template before doing anything else!

Step 2: The Labels Gadget

Make sure that you have the Labels Page Element installed. If you haven't already...
  1. Go to Layout >Page Elements .
  2. Click "Add a Gadget" and then add the "Labels" gadget.
Step 3: Locating the "Old Code"
  1. Now go to Layout >Edit HTML
  2. Make sure that the "Expand Widgets Template" box is unchecked.
  3. Now we need to search for the code that looks like this.
    <b:widget id='Label1' locked='false' title='Tags' type='Label'/>
    Your code may look a little different. So try using your browser's search tool to find type='Label'.
Step 4: Replacing the "Old Code" with the "New Code"
  1. Once you've located type='Label', remove the whole line of code that looks just like the code mentioned in part 3 of step 3.
  2. Replace this code that you've just deleted with the code below:
    /*
    Distributed by John Smith at WidgetsForFree.blogspot.com
    */ <b:widget id='Label1' locked='false' title='Tags' type='Label'>
    <b:includable id='main'>
    <b:if cond='data:title'>
    <h2><data:title/></h2>
    </b:if>
    <div class='widget-content' style='text-align: justify;'>
    <script type='text/javascript'>
    /*
    Simple Blogger Tag Cloud Widget
    by Raymond May Jr.
    http://www.compender.com
    Released to the Public Domain
    */
    
    //Settings / Variables
    var max = 150; //max css size (in percent)
    var min = 70; //min css size (in percent)
    var showCount = false;  // show counts? true for yes, false for no
    var minCount = 1;  // what is the minimum count for a tag to be shown? 1 for all
    
    
    //Begin code:
    var range = max - min;
    
    //Build label Array
    var labels = new Array();
    <b:loop values='data:labels' var='label'>
    labels.push(&quot;<data:label.name/>&quot;);
    </b:loop>
    
    //URLs
    var urls = new Array();
    <b:loop values='data:labels' var='label'>
    urls.push(&quot;<data:label.url/>&quot;);
    </b:loop>
    
    //Counts
    var counts = new Array();
    <b:loop values='data:labels' var='label'>
    counts.push(&quot;<data:label.count/>&quot;);
    </b:loop>
    
    //Number sort funtion (high to low)
    function sortNumber(a, b)
    {
    return b - a;
    }
    
    //Make an independant copy of counts for sorting
    var sorted = counts.slice();
    
    //Find the largest tag count
    var most = sorted.sort(sortNumber)[0];
    
    //Begin HTML output
    for (x in labels)
    {
    if(x != &quot;peek&quot; &amp;&amp; x != &quot;forEach&quot; &amp;&amp; counts[x] >= minCount)
    {
    //Calculate textSize
    var textSize = min + Math.floor((counts[x]/most) * range);
    //Show counts?
    if(showCount)
    {
    var count = &quot;(&quot; + counts[x] + &quot;)&quot;;
    }else{
    var count = &quot;&quot;;
    }
    //Output
    document.write(&quot;<span style='font-size:&quot; + textSize + &quot;%'><a href='&quot; + urls[x] + &quot;' style='text-decoration:none;'>&quot; + labels[x] + count + &quot;</a></span> &quot; );
    }
    }
    </script>
    <br/>
    <span style="font-size:80%;float:right;">Powered by <a href="http://www.widgetsforfree.blogspot.com">Blogger Widgets</a></span>
    </div>
    </b:includable>
    </b:widget>

Step 5:
Previewing the New Tag Cloud
Before saving the template make sure to click preview. The new tag cloud should now be visible. If not, make sure that you've completed all the steps correctly.

Latest Facebook With google


  1. Facebook-Linked-AccountsLog in to your Facebook profile.
  2. Go to Account Settings.
  3. Observe “Linked Accounts” option and click “change” link
  4. Following box appears below Linked Accounts.

     
  5. Select Google and New Window Appears with Google Login Box.
  6. Sign In To Google with the account you want Facebook to get Linked.
  7. Confirm the Account Linking in Google as shown below,

    Facebook-Linked-Accounts-Google-Confirmation 
  8. Click “Allow” button and you are done !
  9. In Similar manner you can link MySpace and Yahoo accounts too !
  10. Log in to your Facebook profile.
  11. Go to Account Settings.
  12. Observe “Linked Accounts” option and click “change” link
  13. Following box appears below Linked Accounts.

    Facebook-Linked-Accounts
     
  14. Select Google and New Window Appears with Google Login Box.
  15. Sign In To Google with the account you want Facebook to get Linked.
  16. Confirm the Account Linking in Google as shown below,

    Facebook-Linked-Accounts-Google-Confirmation
     
  17. Click “Allow” button and you are done !
  18. In Similar manner you can link MySpace and Yahoo accounts too !

Best Facebook Desktop Client Application Latest


Photo-Uploader-Adobe-AIR-Client-1
  • You get all the updates from friends on the same window.
  • All the features are included in tabs and easy to navigate !
  • On RHS you get the micro news feed of ALL the activities including updates from Groups and Pages you joined !
  • You can visit individual friends profile right within the Application !
  • It is based on AIR technology and created by Adobe and hence Safe and Secure !
  • You also get update notification bubbles in top of RHS of application!

Improved Facebook Chat in Photo Uploader !

Photo-Uploader-Adobe-AIR-Chat-Client
  1. Nicely managed chat interface !
  2. Friends list on left for better navigation !
  3. Ample space for chatting !
  4. Chat input box wide enough to cover several chats !

Top Widget Blogger/Blogspot Thumb

Thumb Up Rating Widget For Blogger

1. Go to your Blogger Dashboard click on ---> Design tab ---> Edit HTML tab.

2. Make sure to take backup of your Template before making any changes to your HTML. (More Info On: How To Backup Blogger Template.

3. Now click on Expand Template Widgets check box.

4. Search for below code in your Template. More Info On: "How To Find A Code In Blogger Template".
<data:post.body/> 
5. Copy and Paste following code just Above <data:post.body/>.
<b:if cond='data:blog.pageType == &quot;item&quot;'>
<div class='js-kit-rating' expr:path='data:post.url' expr:permalink='data:post.url' expr:title='data:post.title' view='score'></div>
</b:if>
6. Widget will display only on post pages and not on Homepage. If you like to display widget in both post pages and Homepage then remove two lines highlighted in blue color from the above code.

7. Now search for below piece of code.
</body>
8. Copy and Paste following script Above </body>.
<script src="http://js-kit.com/ratings.js"></script> 
9. That's It, save your template and see working rating widget under your blog post titles.

10. Check the rating widget by clicking Thumb Up or Thumb Down.

Need any help? use comment section for posting your queries....1. Go to your Blogger Dashboard click on ---> Design tab ---> Edit HTML tab.

2. Make sure to take backup of your
Template before making any changes to your HTML.

3. Now click on
Expand Template Widgets check box.

4. Search for below code in your
Template.
<data:post.body/> 
5. Copy and Paste following code just Above <data:post.body/>.
<b:if cond='data:blog.pageType == &quot;item&quot;'>
<div class='js-kit-rating' expr:path='data:post.url' expr:permalink='data:post.url' expr:title='data:post.title' view='score'></div>
</b:if>
6. Widget will display only on post pages and not on Homepage. If you like to display widget in both post pages and Homepage then remove two lines highlighted in blue color from the above code.

7. Now search for below piece of code.


</body>
8. Copy and Paste following script Above </body>.
<script src="http://js-kit.com/ratings.js"></script> 
9. That's It, save your template and see working rating widget under your blog post titles.

10. Check the rating widget by clicking Thumb Up or Thumb Down.


Need any help? use comment section for posting your queries....

Latest Hack Blogger/Blogspot How To Create A Poll

Create & Add Polls To Blog

1. Go to PollsDaddy.com.

2. Click on button that says "
Sing up for a free account now!".

3. On next screen Choose "
Free" service.

4. Now fill up all the required fields and create account.


5. Once account created, you will recevie activation link in your email, click on it.


6. Once you click activation link, it will take you to your
Dashboard.

7. Next click on "
Create a new" and select "Poll". Refer screen below.


Create A Poll For Blog

8. Next create your poll Question. See my example below.
Create A Online Poll For Blog

9. Next select "Poll Style" and "Poll Options".
Select Poll Style

10. Next click on button that says "Create Poll".

11. Now copy provided Javascript code and follow next part below.

How To Add Poll To Blog

1. Go to your Design tab ---> Page Elements tab.

2. Click on "
Add a Widget" then select "HTML/Javascript" Widget.

3. Add copied JavaScript code inside the "
HTML/Javascript" Widget.

4. Save it and view your blog.


If you have any query or need any help feel free to leave a comment below. will reply you soon.

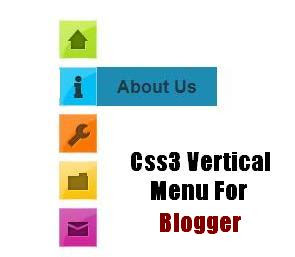
New Blogger/Blogspot Widget Css3 Verticle Slide Menu

Css3 Vertical Side Menu For Blogger 
1. Go to your Blogger Dashboard click on ---> Design tab ---> Edit HTML tab.

2. Make sure to take backup of your
Template before making any changes to your HTML. (More Info On: How To Backup Blogger Template.

3. Now click on
Expand Template Widgets check box.

4. Search for
]]></b:skin> in your Template.
 5. Paste below code above ]]></b:skin>.
/* Css3 Stylish Vertical Side Menu - info @ http://www.ravisaive.in */
#hor {
list-style:none;
padding:0;
margin:0;
}

#hor li {
float:left;
padding:5px;
}

#hor a {
display:block;
height: 12px;
text-indent:-999em;
}

#hor a.home {
width:46px;
background:url(vHome.gif) no-repeat 0 0;
}

#hor a.download {
width:94px;
background:url(vDownload.gif) no-repeat 0 0;
}

#hor a.contact {
width:74px;
background:url(vContact.gif) no-repeat 0 0;
}


/* CSS Style for Vertical Menu */

#ver {
list-style:none;
padding:0;
margin:0;
}

#ver li {
padding:2px;
}

#ver li a {
display:block;
height:12px;
text-indent:-999em;
}

#ver a.home {
width:47px;
background:url(hHome.gif) no-repeat 0 0;
}

#ver a.download {
width:95px;
background:url(hDownload.gif) no-repeat 0 0;
}

#ver a.contact {
width:74px;
background:url(hContact.gif) no-repeat 0 0;
}


.clear {
clear:both;
}


*{
/* A universal CSS reset */
margin:0;
padding:0;
}


#navigationMenu body{
font-size:14px;
color:#666;
background:#111 no-repeat;


/* CSS3 Radial Gradients */
background-image:-moz-radial-gradient(center -100px 45deg, circle farthest-corner, #444 150px, #111 300px);
background-image:-webkit-gradient(radial, 50% 0, 150, 50% 0, 300, from(#444), to(#111));

font-family:Arial, Helvetica, sans-serif;
}

#navigationMenu li{
list-style:none;
height:39px;
padding:2px;
width:40px;
}

#navigationMenu span{
/* Container properties */
width:0;
left:38px;
padding:0;
position:absolute;
overflow:hidden;

/* Text properties */
font-family:'Myriad Pro',Arial, Helvetica, sans-serif;
font-size:18px;
font-weight:bold;
letter-spacing:0.6px;
white-space:nowrap;
line-height:39px;

/* CSS3 Transition: */
-webkit-transition: 0.25s;

/* Future proofing (these do not work yet): */
-moz-transition: 0.25s;
transition: 0.25s;
}

#navigationMenu a{
background:url('https://blogger.googleusercontent.com/img/b/R29vZ2xl/AVvXsEgYFqCUKIBM8BS8HhCO79jkdmAAt4ynV8aM8vbaX7sSdJdXzHJg2bb41PJ-iATqSohVw914FBPoGwl_YHZL_k6ZmyCQ6uohQYM_jOm4Bp6YofmTc48LLgJot-WYT6IsRAV1d8ZYLH6RIVOK/s1600/navigation.jpg') no-repeat;

height:39px;
width:38px;
display:block;
position:relative;
}

/* General hover styles */

#navigationMenu a:hover span{ width:auto; padding:0 20px;overflow:visible; }
#navigationMenu a:hover{
text-decoration:none;

/* CSS outer glow with the box-shadow property */
-moz-box-shadow:0 0 5px #9ddff5;
-webkit-box-shadow:0 0 5px #9ddff5;
box-shadow:0 0 5px #9ddff5;
}

/* Green Button */

#navigationMenu .home { background-position:0 0;}
#navigationMenu .home:hover { background-position:0 -39px;}
#navigationMenu .home span{
background-color:#7da315;
color:#3d4f0c;
text-shadow:1px 1px 0 #99bf31;
}

/* Blue Button */

#navigationMenu .about { background-position:-38px 0;}
#navigationMenu .about:hover { background-position:-38px -39px;}
#navigationMenu .about span{
background-color:#1e8bb4;
color:#223a44;
text-shadow:1px 1px 0 #44a8d0;
}

/* Orange Button */

#navigationMenu .services { background-position:-76px 0;}
#navigationMenu .services:hover { background-position:-76px -39px;}
#navigationMenu .services span{
background-color:#c86c1f;
color:#5a3517;
text-shadow:1px 1px 0 #d28344;
}

/* Yellow Button */

#navigationMenu .portfolio { background-position:-114px 0;}
#navigationMenu .portfolio:hover{ background-position:-114px -39px;}
#navigationMenu .portfolio span{
background-color:#d0a525;
color:#604e18;
text-shadow:1px 1px 0 #d8b54b;
}

/* Purple Button */

#navigationMenu .contact { background-position:-152px 0;}
#navigationMenu .contact:hover { background-position:-152px -39px;}
#navigationMenu .contact span{
background-color:#af1e83;
color:#460f35;
text-shadow:1px 1px 0 #d244a6;
}

/*End Css3 Stylish Vertical Side Menu - info @ http://www.ravisaive.in */
6. Save your template.

7. Now again go to your
Design tab ---> Page Elements tab.

8. Click on "
Add a Widget" then select "HTML/Javascript" Widget.

9. Copy and paste the following code inside the "
HTML/Javascript" Widget.
<div style='position: fixed; top: 40%; left: 0%;'/>
<ul id="navigationMenu">
<li>
<a class="Home" href="http://www.ravisaive.in/">
<span>Home</span>
</a>
</li>
<li>

<a class="about" href="http://www.ravisaive.in/2011/06/about-us.html">
<span>About Us</span>
</a>
</li>

<li>
<a class="categories" href="http://www.ravisaive.in/2011/10/blogger-beginners-guide.html">
<span>Categories</span>
</a>

</li>

<li>
<a class="services" href="http://www.ravisaive.in/2011/01/write-for-us.html">
<span>Services</span>
</a>
</li>

<li>
<a class="contact" href="http://www.ravisaive.in/2011/07/contact-me.html">

<span>Contact</span>
</a>
</li>
</ul>
</div>
10. Replace the URLs in red with your links and change the scroll out text in green above.

11. Save the Widget.

Best Stat Widget for Blogger/Blogspot


1. Go to your Blogger Dashboard click on ---> Design tab ---> Page Elements tab.

2. Make sure to take backup of your
Template before making any changes to your HTML. (More Info On: How To Backup Blogger Template.

3. Click on "
Add a Widget" then select "Blog's stats (New!)" Widget.

4. Select "
Time Period" and "Style" then click on Save Button to Save Widget. Refer below screen.
5. Now View your blog to see working Blog's Stat Widget.

Latest Hack Widget Blogger/Blogspot Stat Counter

 
we’ll use a stat counter that provided by statcounter.com that works perfectly with blogger blogspot blogs.
you will need to join a free acount from here
(it’ll open in a new window)
it won’t take more than 2 minutes,
after registering, and activating your account through your email. please login to your account.

after logging in, click new project.
see image below:

then you’ll be taken to another page,
fill the form as the next.
website title :type here you blog title.
website URL :type here your blog url, it must be like ——.blogspot.com if you using blogger.

and press NEXT.
see image below:

then click : Configure and install code >>
see image below:

after clicking Configure and install code >> you will go to page ask you to choose the kind of stat counter,
there is more 1 kind,
1: visible counter.
2: invisible counter.
3: visible counter on home page only.
4: button only.
choose your favorite one and hit NEXT.
see image below:

at the next page you’ll be at stat counter code setup wizard.
find : do you use a web page editor?
and choose yes, i use.
and then choose blogger.
see image below:

then click NEXT and you will generate your counter code.
Now go to blogger.com
log in to your blogger blogspot account, go to layout section.and click add new element at your template sidebar where you want to add the Stat counter. choose html / jave.
past the statcounter code. and click save.
and now you are done.

this stat counter contain alot of great free features,
and here is some of them. you can find this features when you log in to your account at statcounter.com
1. summary
2. popular pages
3. entry pages
4. exit pages
5. came from
6. keyword analysis
7. recent keyword activities
8. recent came from
9. search engine wars
10. visitor paths
11. visitor length
12. returning visits
13. recent pageload activities
14. recent visitor activity
15. recent visitor map
16. country/state/city/ISP
17. browser
18. system statistics
19. lookup IP address
20. download logs

Enjoy.
and don’t forget that i’m here to help.
if you need any help please leave comment here,

Latest google word doodle enjoy


Guys,Create your word doodle!!!

Organizing a thought and put it into a picture is sometimes a difficult job. But if you can use your keyword as the image the problem goes away.Simple easy way to express a idea or yourself in your keyword can be very useful. There is a website that allows you to do the exact thing very fast and easily with it's simple steps. Follow the steps below and check out this awesome tool.


Create your own word doodle


1. Go to http://www.wordle.net/create


2. Paste your text or blog URL and hit submit


3. Now randomize to choose your style


-you can also view it in new window


-change text front/ language/color


-you can print your picture right from here


-You can also choose to save it in a public gallery


-if you save it you will also have power to embed the code to your blog


4. To save your image in high resolution for your use screenshot it


There you have it!


Best things about wordle.net is that it is extremely simple, fast, contained hundreds of randomized style and completely free. Free for almost any use. Check the FAQ for more info.


Thanks for wordle.net for this amazing tool and feel free to let us know what your making in word doodle.

Latest Free Blogger/Blogspot SEO Template


Personal Press is a premium wordpress theme converted to blogger template.Its Offering Nice features and its SEO Friendly too.
Free Downlaod !!!


Features::

  • SEO Friendly
  • Cool Navigation bar with Hover effect
  • Customised commenting Form
  • Hover effected Ad slots
  • Hover effected Read more buttons without javascript
  • Compatiable with all browsers
  • Automatic Responsive Skin

Customizations::

  • To change Logo-Find this code- id='logo' Replace logo with your logo url
  • Use Jump link in blogger to hide below part of blog posts

Facebook Latest How can I Change The Color of Facebook (FB)

 
By using the Firefox web browser & the Greasemonkey Add-on, and this userscript you are able to change the colors of Facebook to anything you wish.

(1)Make sure you are using the Firefox browser.

(2)Make sure you have the Greasemonkey add-on installed (this requires restarting your browser).


(3)When you have Firefox and Greasemonkey, go to this Facebook colour changer userscript page and click the install button at the top right of the page.

(4)Click to confirm that you wish to install the script, and it will be installed.

(5)Now, when viewing any page on Facebook simply go to ‘Tools’, ‘Greasemonkey’, ‘Userscript Commands…’ and then ‘Customise   facebook colours…’. See the image below for help with this. (Alternatively the same menu can be shown when right-clicking   on the monkey on the bottom right).
Select the colours you’d like facebook to be, click “Set!”, and you’re done!


how to create a photo gallery on blogger using jQuery new Latest

Implement photogallery on blogger 

How to implement this plugin on Blogger

This plugin can be implemented in any websites including blogger. To implement on blogger follow the below procedure. First go to Template and then Edit HTML.
Find ]]></b:skin> and add the following code just after the above code.(#)
<script src='https://ajax.googleapis.com/ajax/libs/jquery/1.7.2/jquery.min.js' type='text/javascript'/>
<link charset='utf-8' href='http://bloggerhow.googlecode.com/hg/prettyPhoto.css' media='screen' rel='stylesheet' type='text/css'/>
<script charset='utf-8' src='http://bloggerhow.googlecode.com/hg/jquery.prettyPhoto.js' type='text/javascript'/>
If you have already the jQuery library in your Template, skip the red colored code.
Before going to next step, we need to check whether $(document).ready(function(){ is present in your template or not. If it is there add following code just after the above code.(#)
$("a[rel^='prettyPhoto']").prettyPhoto();
If the $(document).ready(function(){ is not present in your template, then find <body> add the following code just below.(#)
<script type="text/javascript" charset="utf-8">
  $(document).ready(function(){
    $("a[rel^='prettyPhoto']").prettyPhoto();
  });
</script>
Now save the template. You are ready to use this plugin.

How to use this plugin

From now on you can use this plugin. This can be used with any link. Only condition is you should add a rel='prettyPhoto' tag with link. I am giving you some examples on how to use this plugin in your posts.

Using with an inline link

Demo for this type is available in my blog. You can see many (#) links. These are pictorial illustration of tutorial. Below is an example. This method has an disadvantage. Title for each image is not possible in this method. But we can give individual descriptions.
<a href="IMAGE ADDRESS HERE" rel='prettyPhoto' title='ADD DESCRIPTIONS OF THE PICTURE HERE'>LINK TEXT</a>

Using for image gallery with title and descriptions

For this we need thumbnail of each picture. If you are using Picasa for uploading pictures, this is very easy. See the link for a pictorial illustration(#). From there, you will get both thumbnail links and full resolution image links.
Don't use the full resolution picture link for creating link. If you have many pictures in your post, the loading will increase.
Use the following format to implement a photo gallery in your blog.
<a href="fullscreen_image_1.jpg" rel="prettyPhoto[1]" title="Description to pictures.."><img src="thumbnail_image_1.jpg" width="width of thubmnail" height="some height" alt="Heading for image 1" /></a>

<a href="fullscreen_image_2.jpg" rel="prettyPhoto[1]" title="Description to pictures.."><img src="thumbnail_image_2.jpg" width="width of thubmnail" height="60" alt="Heading for image 2" /></a>

<a href="fullscreen_image_3.jpg" rel="prettyPhoto[1]" title="Description to pictures.."><img src="thumbnail_image_3.jpg" width="width of thubmnail" height="60" alt="Heading for image 3" /></a>
Replace the red colored text with thumbnail links and green colored with full resolution links. rel='prettyPhoto[something]' should be same for all the pictures in a gallery. If you want another gallery in the same post, change the something to another name.

Additional configurations

In default, sharing buttons will be there with popup box. You can disable by adding green colored code inside the bracket as below.
<script type="text/javascript" charset="utf-8">
  $(document).ready(function(){
    $("a[rel^='prettyPhoto']").prettyPhoto({social_tools: false});

  });
</script>
There are many customizations are available. See this page for a full list. If you have any doubt in customization, let me know.

How To Remove Attribution Powered by Blogger Latest

Attribution widget on Blogger 
Step 1: Go to Template &gt; Edit HTML &gt; Proceed
Step 2: Search for attribution, We can find the following code.

<b:widget id='Attribution1' locked='true' title='' type='Attribution'/>
Step 3: Delete or comment out the above code.
Sometime, this method will work. If it is not working use the following method.

  • Using Unlock method
For this method, up to step 2 everything is same. After searching and finding the above code, change the red coloured true to false.
<b:widget id='Attribution1' locked='true' title='' type='Attribution'/>
So the code will be like this.
<b:widget id='Attribution1' locked='false' title='' type='Attribution'/>
Now close Edit HTML. Go to Layout. Find widget named Attribution. Click edit. Click on the Remove button. Gone..
Removing Attribution
  • Hide using CSS Method
For this method, up to step 2 everything is same. Add following code inside your style sheet. i.e., above  ]]></b:skin> tag. Search for this tag and add following just above it. 
#Attribution1 {display: none;}

7 Steps To Get Anyone To Do What You Want


Step 1. Pause.Follow your prospect’s no or objections with a pause. This will give you time to think about the objection and how to handle it. If you jump in straight away you may well say the first thing that comes into your head, and this is unlikely to be the best response.

Step2. Ask questions.Get the customer talking again. Typical questions are: “What do you mean?”, “What are the reasons for that?”, “Why do you say that?”. Instead of a question you could say something like: “Please tell me more.” Use whatever you feel comfortable with. You can’t overcome an objection unless you know exactly what it is.

If someone says, “I don’t like it,” it does doesn’t tell you much, so ask them, “Why don’t you like it?” Depending on what you are selling, the problem could be such things as colour, the shape, the price and so on. Once you know exactly what the objection is you may be able to offer another colour, a different shape or a cheaper product etc.

Step 3. Empty the customer.You need to know that there aren’t other objections. There is often a tendency to deal with one objection only to find another one - and sometimes a further one.

So before trying to overcome the objection make sure there aren’t any more by saying something like, “Is there anything else you are not happy about?”

If they originally said they didn’t like the colour because they prefer red, they may now say that they don’t like the shape and only a round one will do.

“Is there anything else?” you ask. “No” says the customer. Great! You now know the customers only objections are the colour and shape. Time to get excited, as you have other colours and shapes. You’ve nearly made a sale!

Step 3. Lock the customer.
Having emptied the customer, of his or her reasons for saying no, you should be able to obtain a commitment that, once you have overcome the objections, you can go ahead with the sale. You can do this by using the magic word if. If we can overcome this (the colour and shape in our example) I take it we can go ahead.” Your customer now has to commit him or herself.

Step 5. Present your counter argument.
Now you have all the facts and a commitment you are ready to overcome the objections. How can you fail!

Your counter argument must really overcome the problem and bung in a few benefits as well. “I have a round red one in stock that is also a time saving model and is on special offer this week.” Okay, this may not sound perfect but you get the general idea.

Step 6. Gain acceptance to your counter argument.
You should be able to see your commission and money now! This bit should be easy if you have done steps 4 and 5 correctly. You do this by using a ‘closed’ question. This is one where the answer has to be ‘yes' or ‘no’.

Try, “Now that is acceptable isn’t it?” or perhaps, “That answers your point doesn’t it?” How can they possibly say no. Well this is make believe! Sometimes we know that reality can be a little more difficult - but only if you believe it is.

Step 7. Close.Close the sale, you’ve heard a ‘yes’ so get another one.

“So I take it we can go ahead?", you say in your most positive voice.

“Yes,” answers your customer. The band starts to play, everyone is cheering, you are one hell of a salesperson ...

"Yes, but …," No, you don’t have ‘buts’ if you are positive. But … what, horror of horrors, if the customer still says no.

Hey, but you’re cool. No problem. You don’t have to panic or rant and rave. You have another objection, so smile and go back to Step 1. Pause and try again.

If you feel this time that the objection the customer has raised is the only one he/she has, and that you can handle it easily, you can modify the technique and use Steps 1,2,5 and 7. Otherwise go through the Seven Steps again.

Best Blog/Blogger/Blogspot Latest Widgets and Plug-ins to add 2012


Best Widgets and Plugins
The add-on widgets and plug-ins are usually meant for business as well as for personal usage with its remarkable benefits that make your blogging activity more enjoyable and interesting. Blog add-ons help visitors to navigate your blog to the fullest with the best coverage of what you would like to express and share with your readers.
Previous / Next Post buttons:
Buttons that lead you to the previous and next post is one of the common interfaces that most of the blog services offer you, allowing your visitors to view the other pages of your blog with ease. This functionality of the button requires some widget installation from some services that increases reader’s interest to get full coverage to your blog.
Check out our Previous and Newer Posts Links Plugin!
Meta tags
Meta tags help your blog to get categorized based on your content by the search engine when visitors search for a particular topic. Meta tag offers you some space to “define what your articles are about and how they are helpful to the right audience”. This Meta tag helps to give your viewers the first impression on your blog which interest your visitors to click and enter into your blog.
New SEO Preferences includes Meta Tags.
‘Share this’ option
You can make your article get viewed over social network and media websites by placing a “share this” plug-in that allows people to recommend your blog for best information that is to be shared. On installing ‘share this’ plug-in you can place some icons of the social media websites to move your site faster over the internet blogosphere.
A few Sharing Widgets From My Blogger Tips:
Sharing Buttons Below Post Titles
Upgraded Edition of Sharing Buttons
Slide Open Egg Bookmarking
Slide Open Heart

Polls & ratings

Adding polls to your blog increases visitor’s interest to post their opinion and gives space for discussions increasing audience partaking on some issues, news, reviews, products, etc. Rating widget helps to scale the public interest over something they read and discuss. This rating option is open for public or visitors to suggest or give a complete opinion on something they read in your blog.
Top comments
You can include a plug-in to show your blog’s top comments and the most frequent commenter’s with best suggestions and ideas. This activity cheers people to post more comments to show their active participation in discussions that may benefit the readers with good information.
Share your Album and music
Most of the blogs are limited to a personal audience say friends and relatives which does not require more widgets or customization options that is meant for business blogs. With album widget which is built-in widget allows you to add photos to display them on a multiple choice and also they can be customized easily. One can even install a music player to his/her blog with a list of your favorite songs to play them for your visitors.

VISIT MY HACKZONE LABLE LIST AND GET WIDGET MY SELF TESTED

New Latest Blogger 2012 Application For iPhone,iPad,iPod Touch


Blogger has announced the new app for iOS (iPhone, iPad, iPod). It has got plenty of features and it really could come in handy for many of Blogger users. I have mentioned all the features of the Blogger App for iOS below. You can also add Labels and Locations to posts in order to provide more details about a certain post.

How to Automatic blog setting Latest 2012


1.Create a blog on blogspot.com

2.Create an e-mail acount on gmail

3.Enable e-mail posting to your blogspot.com blog

4.Forward all e-mails to your e-mail posting adress

5.Go to feedmyinbox.com and subscribe to all the feeds you want

That’s all, a very easy method to auto post on blogspot.com blogs.

The only isue is that it will not be unique content.