
1. Go to your
Blogger Dashboard click on --->
Design tab --->
Edit HTML tab.
2. Make sure to take backup of your
Template before making any changes to your
HTML. (
More Info On: How To Backup Blogger Template.
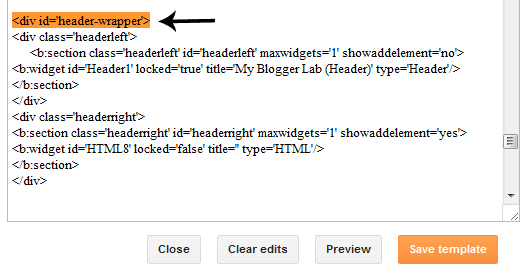
3. Now click on
Expand Template Widgets check box.
4. Search for below code in your
Template.
More Info On: "
How To Find A Code In Blogger Template".
<data:post.body/>
5. Copy and Paste following code just Above
<data:post.body/>.
<b:if cond='data:blog.pageType == "item"'>
<div class='js-kit-rating' expr:path='data:post.url' expr:permalink='data:post.url' expr:title='data:post.title' view='score'></div>
</b:if>
6. Widget will display only on post pages and not on Homepage. If
you like to display widget in both post pages and Homepage then remove
two lines highlighted in blue color from the above code.
7. Now search for below piece of code.
</body>
8. Copy and Paste following script Above
</body>.
<script src="http://js-kit.com/ratings.js"></script>
9. That's It, save your template and see working rating widget under your blog post titles.
10. Check the rating widget by clicking Thumb Up or Thumb Down.
Need any help? use comment section for posting your queries....1. Go to your
Blogger Dashboard click on --->
Design tab --->
Edit HTML tab.
2. Make sure to take backup of your
Template before making any changes to your
HTML. (
More Info On: How To Backup Blogger Template.
3. Now click on
Expand Template Widgets check box.
4. Search for below code in your
Template.
More Info On: "
How To Find A Code In Blogger Template".
<data:post.body/>
5. Copy and Paste following code just Above
<data:post.body/>.
<b:if cond='data:blog.pageType == "item"'>
<div class='js-kit-rating' expr:path='data:post.url' expr:permalink='data:post.url' expr:title='data:post.title' view='score'></div>
</b:if>
6. Widget will display only on post pages and not on Homepage. If
you like to display widget in both post pages and Homepage then remove
two lines highlighted in blue color from the above code.
7. Now search for below piece of code.
</body>
8. Copy and Paste following script Above
</body>.
<script src="http://js-kit.com/ratings.js"></script>
9. That's It, save your template and see working rating widget under your blog post titles.
10. Check the rating widget by clicking Thumb Up or Thumb Down.
Need any help? use comment section for posting your queries....
1. Go to your Blogger Dashboard click on ---> Design tab ---> Edit HTML tab.
2. Make sure to take backup of your
Template before making any changes to your HTML.
3. Now click on
Expand Template Widgets check box.
4. Search for below code in your
Template.
<data:post.body/>
5. Copy and Paste following code just Above <data:post.body/>.
<b:if cond='data:blog.pageType == "item"'>
<div class='js-kit-rating' expr:path='data:post.url' expr:permalink='data:post.url' expr:title='data:post.title' view='score'></div>
</b:if>
6. Widget will display only on post pages and not on Homepage. If
you like to display widget in both post pages and Homepage then remove
two lines highlighted in blue color from the above code.
7. Now search for below piece of code.
</body>
8. Copy and Paste following script Above </body>.
<script src="http://js-kit.com/ratings.js"></script>
9. That's It, save your template and see working rating widget under your blog post titles.
10. Check the rating widget by clicking Thumb Up or Thumb Down.
Need any help? use comment section for posting your queries....


