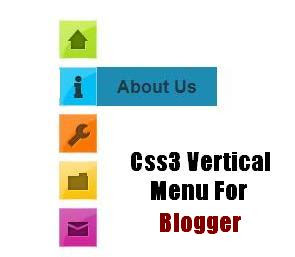
1. Go to your Blogger Dashboard click on ---> Design tab ---> Edit HTML tab.
2. Make sure to take backup of your Template before making any changes to your HTML. (More Info On: How To Backup Blogger Template.
3. Now click on Expand Template Widgets check box.
4. Search for ]]></b:skin> in your Template.
5. Paste below code above ]]></b:skin>.
/* Css3 Stylish Vertical Side Menu - info @ http://www.ravisaive.in */
#hor {
list-style:none;
padding:0;
margin:0;
}

#hor li {
float:left;
padding:5px;
}

#hor a {
display:block;
height: 12px;
text-indent:-999em;
}

#hor a.home {
width:46px;
background:url(vHome.gif) no-repeat 0 0;
}

#hor a.download {
width:94px;
background:url(vDownload.gif) no-repeat 0 0;
}

#hor a.contact {
width:74px;
background:url(vContact.gif) no-repeat 0 0;
}


/* CSS Style for Vertical Menu */

#ver {
list-style:none;
padding:0;
margin:0;
}

#ver li {
padding:2px;
}

#ver li a {
display:block;
height:12px;
text-indent:-999em;
}

#ver a.home {
width:47px;
background:url(hHome.gif) no-repeat 0 0;
}

#ver a.download {
width:95px;
background:url(hDownload.gif) no-repeat 0 0;
}

#ver a.contact {
width:74px;
background:url(hContact.gif) no-repeat 0 0;
}


.clear {
clear:both;
}


*{
/* A universal CSS reset */
margin:0;
padding:0;
}


#navigationMenu body{
font-size:14px;
color:#666;
background:#111 no-repeat;


/* CSS3 Radial Gradients */
background-image:-moz-radial-gradient(center -100px 45deg, circle farthest-corner, #444 150px, #111 300px);
background-image:-webkit-gradient(radial, 50% 0, 150, 50% 0, 300, from(#444), to(#111));

font-family:Arial, Helvetica, sans-serif;
}

#navigationMenu li{
list-style:none;
height:39px;
padding:2px;
width:40px;
}

#navigationMenu span{
/* Container properties */
width:0;
left:38px;
padding:0;
position:absolute;
overflow:hidden;

/* Text properties */
font-family:'Myriad Pro',Arial, Helvetica, sans-serif;
font-size:18px;
font-weight:bold;
letter-spacing:0.6px;
white-space:nowrap;
line-height:39px;

/* CSS3 Transition: */
-webkit-transition: 0.25s;

/* Future proofing (these do not work yet): */
-moz-transition: 0.25s;
transition: 0.25s;
}

#navigationMenu a{
background:url('https://blogger.googleusercontent.com/img/b/R29vZ2xl/AVvXsEgYFqCUKIBM8BS8HhCO79jkdmAAt4ynV8aM8vbaX7sSdJdXzHJg2bb41PJ-iATqSohVw914FBPoGwl_YHZL_k6ZmyCQ6uohQYM_jOm4Bp6YofmTc48LLgJot-WYT6IsRAV1d8ZYLH6RIVOK/s1600/navigation.jpg') no-repeat;

height:39px;
width:38px;
display:block;
position:relative;
}

/* General hover styles */

#navigationMenu a:hover span{ width:auto; padding:0 20px;overflow:visible; }
#navigationMenu a:hover{
text-decoration:none;

/* CSS outer glow with the box-shadow property */
-moz-box-shadow:0 0 5px #9ddff5;
-webkit-box-shadow:0 0 5px #9ddff5;
box-shadow:0 0 5px #9ddff5;
}

/* Green Button */

#navigationMenu .home { background-position:0 0;}
#navigationMenu .home:hover { background-position:0 -39px;}
#navigationMenu .home span{
background-color:#7da315;
color:#3d4f0c;
text-shadow:1px 1px 0 #99bf31;
}

/* Blue Button */

#navigationMenu .about { background-position:-38px 0;}
#navigationMenu .about:hover { background-position:-38px -39px;}
#navigationMenu .about span{
background-color:#1e8bb4;
color:#223a44;
text-shadow:1px 1px 0 #44a8d0;
}

/* Orange Button */

#navigationMenu .services { background-position:-76px 0;}
#navigationMenu .services:hover { background-position:-76px -39px;}
#navigationMenu .services span{
background-color:#c86c1f;
color:#5a3517;
text-shadow:1px 1px 0 #d28344;
}

/* Yellow Button */

#navigationMenu .portfolio { background-position:-114px 0;}
#navigationMenu .portfolio:hover{ background-position:-114px -39px;}
#navigationMenu .portfolio span{
background-color:#d0a525;
color:#604e18;
text-shadow:1px 1px 0 #d8b54b;
}

/* Purple Button */

#navigationMenu .contact { background-position:-152px 0;}
#navigationMenu .contact:hover { background-position:-152px -39px;}
#navigationMenu .contact span{
background-color:#af1e83;
color:#460f35;
text-shadow:1px 1px 0 #d244a6;
}

/*End Css3 Stylish Vertical Side Menu - info @ http://www.ravisaive.in */
6. Save your template.7. Now again go to your Design tab ---> Page Elements tab.
8. Click on " Add a Widget" then select "HTML/Javascript" Widget.
9. Copy and paste the following code inside the " HTML/Javascript" Widget.
<div style='position: fixed; top: 40%; left: 0%;'/>
<ul id="navigationMenu">
<li>
<a class="Home" href="http://www.ravisaive.in/">
<span>Home</span>
</a>
</li>
<li>

<a class="about" href="http://www.ravisaive.in/2011/06/about-us.html">
<span>About Us</span>
</a>
</li>

<li>
<a class="categories" href="http://www.ravisaive.in/2011/10/blogger-beginners-guide.html">
<span>Categories</span>
</a>

</li>

<li>
<a class="services" href="http://www.ravisaive.in/2011/01/write-for-us.html">
<span>Services</span>
</a>
</li>

<li>
<a class="contact" href="http://www.ravisaive.in/2011/07/contact-me.html">

<span>Contact</span>
</a>
</li>
</ul>
</div>
10. Replace the URLs in red with your links and change the scroll out text in green above.11. Save the Widget.

Nice blog! Is your theme custom made or did you download it from somewhere?
ReplyDeleteA theme like yours with a few simple tweeks would really make my blog shine.
Please let me know where you got your theme. Thanks
Here is my webpage : brown acne scars
If some one wants to be updated with latest technologies therefore he must be pay a quick
ReplyDeletevisit this web page and be up to date daily.
Also visit my web site ... whitening cream
Useful information. Lucky me I found your website by accident, and I am
ReplyDeleteshocked why this accident didn't took place earlier! I bookmarked it.
Feel free to visit my blog - acne solutions
Hello just wanted to give you a quick heads up. The words in your
ReplyDeletepost seem to be running off the screen in Firefox. I'm not sure if this is a format issue or something to do with internet browser compatibility but I thought I'd post to let
you know. The layout look great though! Hope you get the problem solved soon.
Kudos
Review my web site ; how to get rid of acne fast overnight at home